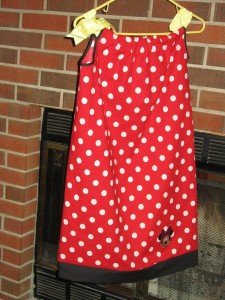
I have a confession. I’m in my 30’s and I can’t sew. I still have to send all my hemming projects (and I’m 5’3″ so there are several) to my mom. Yes it’s embarrassing, but it’s a fact. Because of this, any cool sewing projects on my blog come right from my mom. Last month, my mom made Minnie Mouse pillowcase dresses for her young granddaughters. I personally think my daughter is really cute. But my daughter in this dress… it was a cute overload. She got away with more that first day than usual. Here is how to make a Minnie Mouse pillowcase dress in my mom’s words.
Materials needed:
1) one yard of red fabric with white polka dots
2) ¼ yard of black fabric
3) Red thread, black thread
4) Yellow ribbon
5) Purchased or hand-made Minnie appliqué
6) Package of black double-fold bias binding
Steps:
1) Prewash fabric
2) Straighten up the edge of all fabrics. Cut the red fabric to the desired length, minus 2 ½ inches
3) Cut a six-inch-wide strip of the black fabric.

4) Fold the black strip in half, and press; wrong sides together.

5) Stitch the long raw edges of the black strip together.

6) Sew this strip to the bottom of the red and white fabric. Either serge the edge or zig-zag stitch it.

7) One of the fabrics may be wider than the other. Cut the wider one so that they are the same width. In my case, I had to cut a bit off the black fabric.
8) Pin the long edges of the dress together (right sides together so the dress looks inside out), making a tube. Before you stitch, fold back a triangle on each side of the black fabric and stitch it into place. Then stitch the long edge.

9) Turn the tube right side out and lay it flat so that the seam is right down the middle. This will be the back of the dress. Fold it lengthwise in half again right down that seam to cut both arm holes at the same time.
10) Measure in 2” along the top and 7” down the side. Cut an armhole there. Be sure you are cutting on the side that has the multiple folds of fabric. If you do this wrong, you will be cutting an armhole in the middle of the dress, and you will have to hope that this child has a much-shorter cousin that you can use this dress for. You’ll have to start all over again on this one. Serge or zig-zag this edge. Also zig-zag the top middle of both the front and back.
11) Apply the bias binding to the armholes. Pin on the front and back, and stitch through, being careful to catch both sides. You may have to stitch it more than once to accomplish this.

12) How wide is your ribbon? Double that and fold down the top of front and back. Press. Unfold it, and fold up so that the zig-zagged edge touches the first fold. Fold that, and stitch in place at the bottom, creating a pocket.
13) Thread the ribbon through this pocket, apply the appliqué and you are done. This dress gathers at the top and ties on only one side. Make a big Minnie bow!
Aren’t they cute?! Again, I know nothing about sewing, but according to my mom, these are easy to make as far as sewing projects go.


